
Tags
12x12, brads, Christmas, corner punch, Cricut, dcwv, embellishments, glitter, hole punch, letters, me & my big ldeas, Paper, ribbon, scrapbook, Scrapbooking, soft spoken, stickers, xyron
I am very good at organizing my scrapbooking projects, a little too good. I think I have more pages organized than completed. I get excited about some photos and gather the paper I want to use, a collection of embellishments, stickers, memorabilia, etc. I then use clear scrapbooking files or clear plastic boxes to keep it all together until I actually do the page I had in mind. And there my pages sit waiting until I get the gumption or inspiration to actually put them together.
There is a downside to this method. I find that I tend to over buy materials. Or since I have them all organized away, I forget that I have them. Recently I discovered that I purchased the same sticker set three times, for three different projects, that I completely forgot that I had in the first place. I guess I really like the stickers. (PS still have yet to work on any of those three projects.)
So the other day I was picking up my crafting space a bit and picked up one of my organized clear boxes when inspiration struck. Or it might possibly be that scrapping is much more fun than cleaning.
Out of the box I pulled some Christmas photos I scanned and had reprinted a bit ago. Also tucked away I had a Christmas paper stack (So that’s where that went to!), some embellishments, stickers, and letters. I guess since the weather is finally cold here, working on Christmas pages seems an appropriate subject matter.


Below I will break down what I used, what I like about these pages, and of course what I don’t like.
Let’s start with this little gem of a photo of Santa and me. So to the best of my guessing ability this photo is from somewhere between 1982 to 1984. Early 1985 my first sibling appeared and that years photo would have both of us in it.
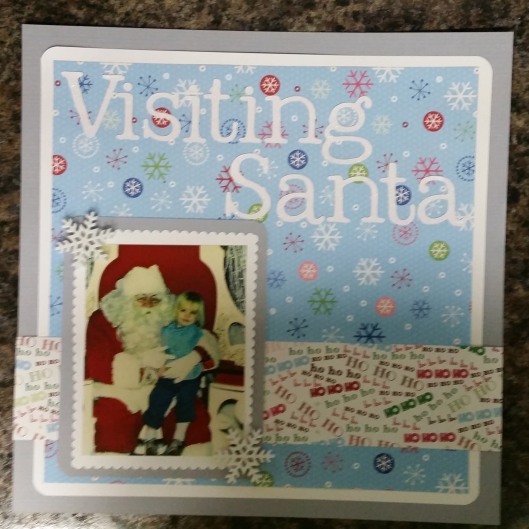
Me…somewhere in between 1982 and 1984…before siblings
(~~*sigh*~~ shadows and blurriness. I must work on my photo taking!)
What I used:
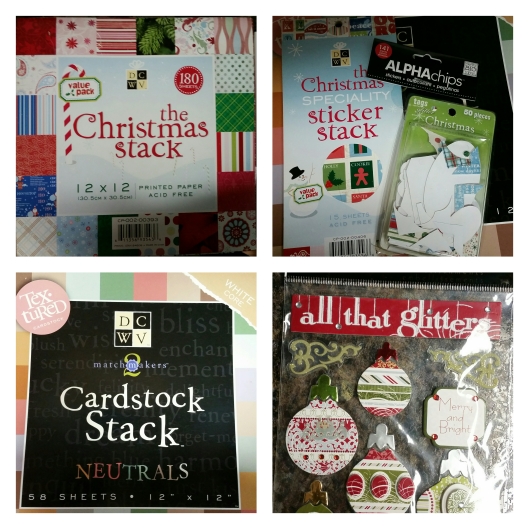
- DCWV Christmas paper stack
- DCWV Neutral Card stock paper stack
- Corner rounding punch
- Large 3d snowflake buttons
- White Glitter Card Stock paper (found on clearance at Wal-mart. Sorry I don’t remember the brand)
- Paper edging sissors
- Glue dots and Glue tape runner
- Cricut and Cricut cartridge doodle type
- Xyron sticker maker machine
I had a few selections for my patterned paper to choose from. In the end I went with the snowflakes and “ho ho ho” paper because this photo was originally a Polaroid. Either it always had a green cast to it or age changed the color. Going with the predominately blue background and blue grey solid paper helped tone the green cast down in the photo a lot! It also helps that it is a similar color to my top in the photo.
I cut the letters out using my Cricut machine and the Doodle type cartridge. I had to turn up the cutting pressure so it could cut through the paper with all the glitter on the top. (It kinda bums me out that the glitter isn’t easy to see in the photo.) I then put the letters through the large Xyron sticker maker machine so they could be easily attached.
I don’t think I need to go over the construction, pretty self explanatory, right?
I am overall pleased with this page. I really like the large button snowflakes I incorporated in. I would like to add the official year to the page after I consult with my mom about when this photo was taken.
By the way, when using 3d elements and keeping the pages in a binder or book, it is helpful to add spacers in the binding so the touching pages do not bend or crease around the raised item. I have even placed a piece of bubble wrap between the pages for added protection.
Now on to the the next page! I featured a photo of my crying tiny mother, my Aunt having a complete meltdown and a very grumpy, probably at his wits end, Santa.
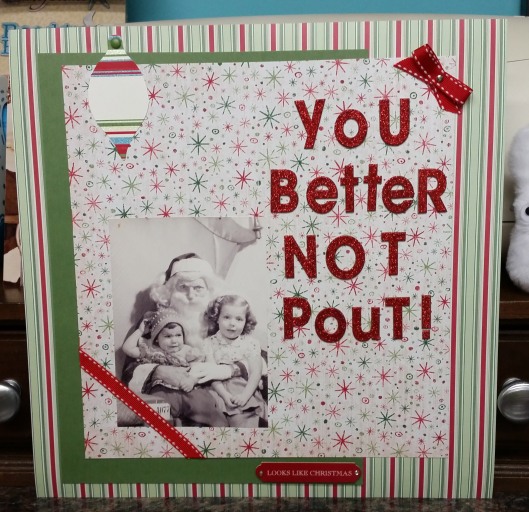
My mom and Aunt. Probably late 50’s
I don’t know why but I love this photo of them and poor grumpy Santa. I smile every time I see it.
I used on this page:
- DCWV Christmas paper stack (patterned paper)
- DCWV Christmas Embellishments pack (ornament)
- Green Card stock -brand unknown
- Me & My Big Ideas Alpha Chips in red glitter
- Me & My Big Ideas Soft Spoken Embellishment Christmas stickers (“Looks Like Christmas” sticker on bottom)
- Scrap of ribbon
- Silver brad (at ribbon bow)
- Green brad (at ornament die cut)
- Glue tape runner
- Hole punch for brads
Materials used on both pages
So this page is an instance of where I should have bought two packs of the glitter letters. There were not enough lower case letters to finish my title. I thought using a mixture of upper and lower case letters might look interesting so I decided that I would try it out. I wanted to make sure I got the spacing right so I cut out a piece of clear acetate to the size space I had for my letters. I thought I could line up the letters, adjust spacing as needed, and visually see what the page would look like without the commitment of actually placing them on the paper. I did like the mix of letter sizes and proceeded to put down my pre-selected letters following my spacing guide.
Getting to the end of “better” I realized I was in trouble. I went to remove a “t” from the plastic and the front completely ripped off the back! The clear acetate is the same material they use to attach stickers to in their packaging so I thought I was being really smart. I was wrong. The letters started to adhere down to my cut piece of clear plastic! Thankfully I had an extra “t” that I did not touch yet to replace my shredded no longer sticky “t”. I quickly placed the rest of the word down and moved on to “NOT”. More problems! I partially separated the “N” off the backing. Being flustered with the letters, I didn’t get the placement perfectly where I wanted it. It was firmly attached by this point, so I tried to space the “O”close to where I wanted it. Now on to the “T”. Again the back started to rip off and as I was looming over my work, “T” in hand, I somehow managed to DROP IT and it landed almost on target, right side up and stuck to the paper. I tried to pull it up slowly but it would not let go of the paper. NOOOOOOOO! I had a tiny pity party for myself staring at my less than perfect placement of “NOT” and then decided to finish up the letters anyways.
I considered trashing my efforts so far and starting new with different letters, but couldn’t bring myself to waste all those letters. I will live with it’s imperfection. Aside from my letter fiasco I like this page. I think it is an appropriate title for the photo and the printed paper looks like it could be from the 50’s. I printed an extra copy of this photo as well, I may just remake this page for my mom sometime. She can have the more perfect one.
I added the “LOOKS LIKE CHRISTMAS” sticker to the bottom as a small inside joke. It has been noted that both my mom and I have fairly nice Santa photos up until we were joined by our siblings. All Santa photos including our younger siblings have one of the them having a melt down. My grandmother was always with us during Santa photos. I wonder if she had a sense of deja vu taking us to see Santa as kids? Maybe she was hoping for just one photo where all the kids behaved. 🙂
